Every professional and hobbyist welder knows that the arc is a thing of beauty—a controlled burst of energy that fuses metal together with incredible precision and power. However, that beauty comes with a serious warning. The intense light produced by the welding arc is a concentrated source of ultraviolet (UV) and infrared (IR) radiation, both of which are extremely harmful to the naked eye. In fact, a single, unprotected glance at a welding arc can cause a painful condition known as “arc eye” or “welder’s flash,” and repeated exposure can lead to permanent vision damage.
This is precisely why a welding helmet is the most critical piece of personal protective equipment (PPE) in a welder’s arsenal. But not all helmet lenses are created equal. The key to effective protection lies in selecting the correct lens shade. If you’re looking for a definitive resource to help you make the right choice, you’ve come to the right place. This article serves as a comprehensive welding helmet lens shade guide with chart, designed to help you understand the science behind shade selection and how to apply it to your specific welding process. By the time you’re finished reading, you’ll be equipped to choose the perfect shade for any welding job, ensuring your most valuable asset—your vision—is protected for a lifetime of welding.
The Science Behind the Shade: Why Darkness Matters
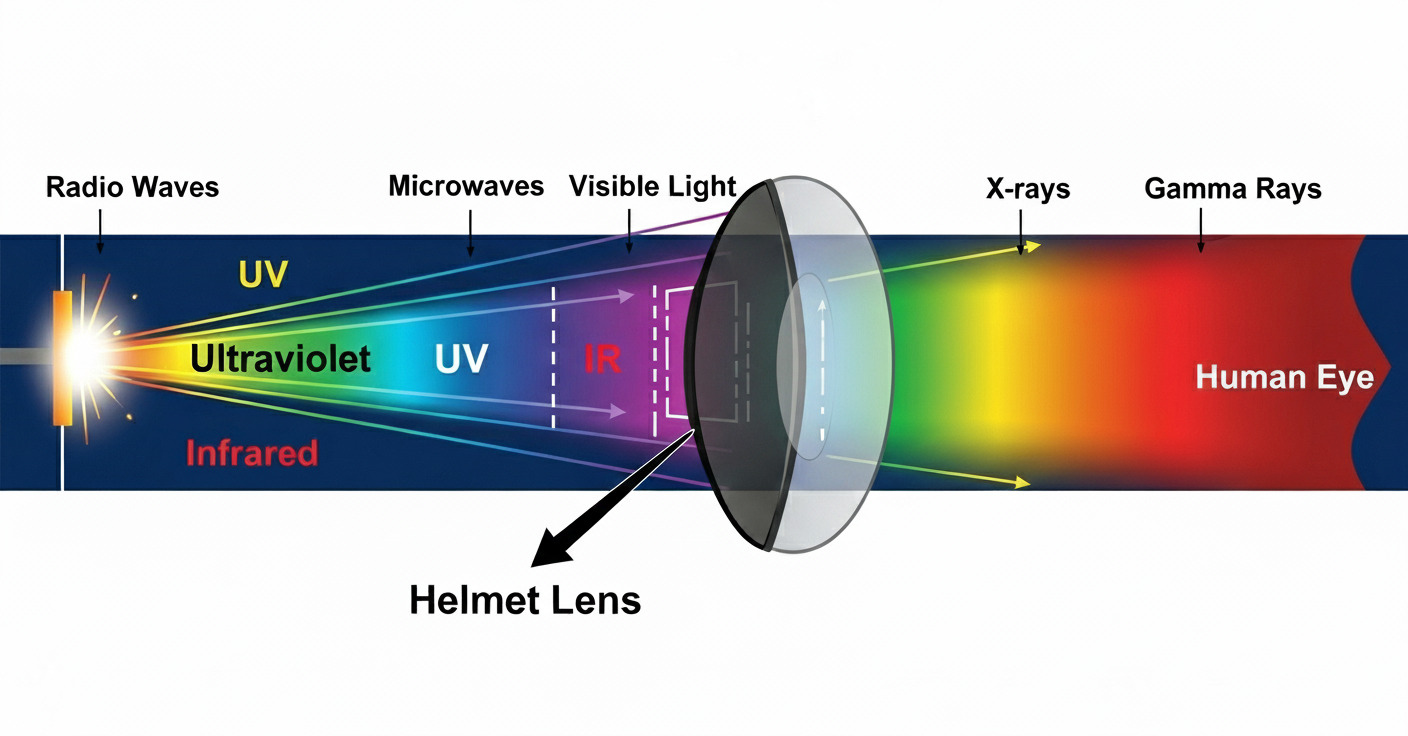
Before we dive into the specific shade recommendations, it’s crucial to understand why they are so important. The bright flash of a welding arc is a visible manifestation of a much broader spectrum of electromagnetic radiation. In addition to the blinding visible light, the arc also produces high levels of invisible UV and IR radiation. UV radiation is responsible for the sunburn-like effect on the cornea that causes arc eye, while IR radiation can cause retinal burns and long-term vision problems. The lens of a welding helmet is designed to do far more than just dim the visible light. It’s engineered to filter out virtually all of the harmful UV and IR rays, regardless of its shade number. The shade number itself refers to the lens’s ability to reduce the intensity of visible light. The higher the shade number, the darker the lens and the greater the reduction of light. This is why a simple piece of dark glass is not enough—it must also be certified to block the harmful invisible radiation. For a detailed explanation of the technology that makes modern welding helmets so effective, you can read our guide on how auto-darkening welding helmets work.

Understanding the Welding Shade Chart
The welding shade guide with chart is a standardized reference tool that provides recommended shade numbers based on the welding process and the amperage (or current) being used. These charts are developed and regularly updated by organizations like the American National Standards Institute (ANSI) to ensure welder safety. The recommendations are not arbitrary; they are based on extensive research into the minimum shade required to prevent eye damage for a given light intensity. However, it’s important to remember that these charts are a guide, not a fixed rule. Your personal vision, the ambient light in your workspace, and the specific material you are welding can all influence your final shade choice. Therefore, the chart serves as an excellent starting point from which you can make minor adjustments for optimal comfort and visibility.

The Official ANSI Z49.1 Shade Recommendations
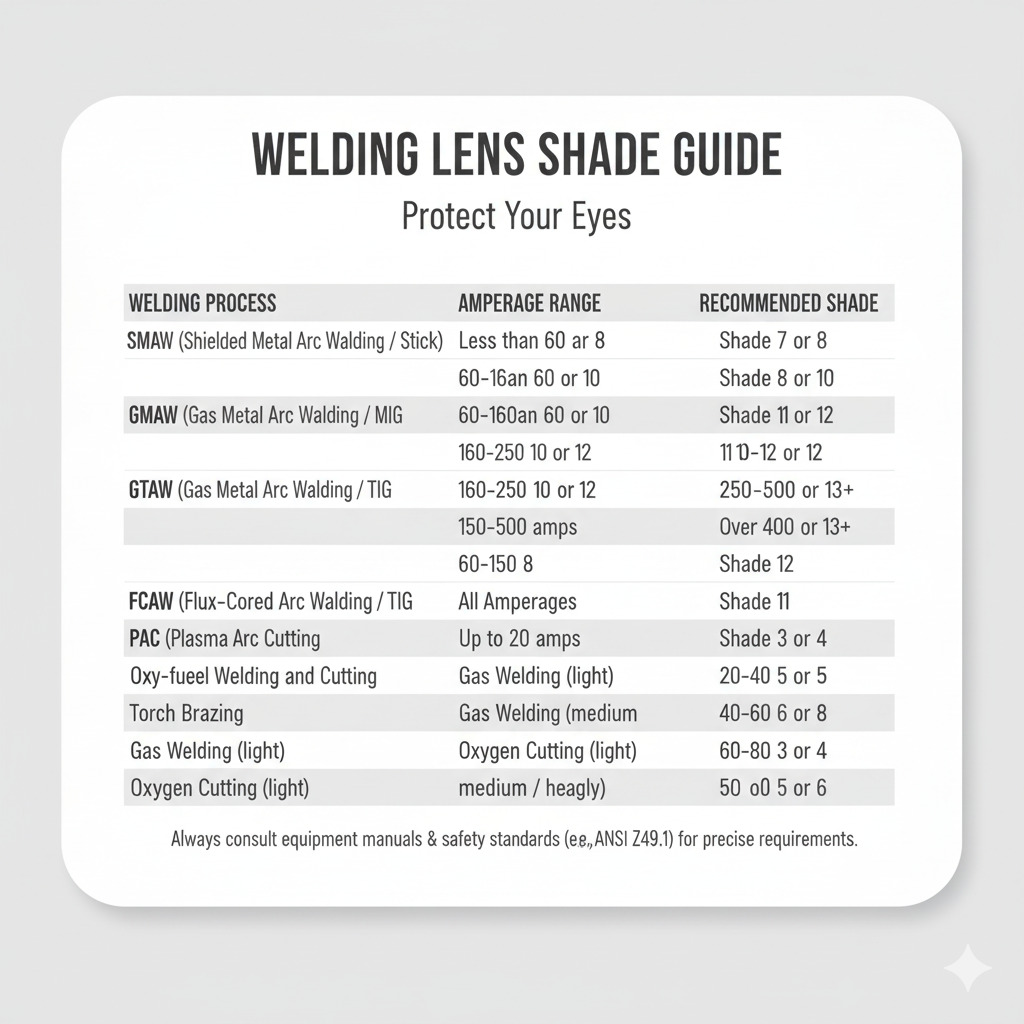
The most widely accepted standard in the United States is the ANSI Z49.1 standard, which outlines safety recommendations for welding and cutting. The following chart, based on these standards, is your go-to reference for selecting the correct lens shade. The shade numbers provided are a starting point, and it’s generally recommended to choose a shade that is one or two numbers higher than the minimum for added comfort and protection. For processes with a wide amperage range, the chart recommends a shade range to match.
Welding Shade Chart (ANSI Z49.1 Guidelines)
SMAW (Shielded Metal Arc Welding / Stick)
- Less than 60 amps: Shade 7 or 8
- 60-160 amps: Shade 8 or 10
- 160-250 amps: Shade 10 or 12
- 250-400 amps: Shade 12 or 14
- Over 400 amps: Shade 14+
GMAW (Gas Metal Arc Welding / MIG)
- Less than 60 amps: Shade 8 or 10
- 60-160 amps: Shade 10 or 11
- 160-250 amps: Shade 11 or 12
- 250-400 amps: Shade 12 or 13
- Over 400 amps: Shade 13+
GTAW (Gas Tungsten Arc Welding / TIG)
- Less than 60 amps: Shade 8
- 60-150 amps: Shade 10
- 150-500 amps: Shade 12
FCAW (Flux-Cored Arc Welding)
- All Amperages: Shade 11
PAC (Plasma Arc Cutting)
- Up to 20 amps: Shade 9
- 20-40 amps: Shade 11
- 40-60 amps: Shade 12
- 60-80 amps: Shade 14
Oxy-fuel Welding and Cutting
- Torch Brazing: Shade 3 or 4
- Gas Welding (light): Shade 4 or 5
- Gas Welding (medium): Shade 5 or 6
- Gas Welding (heavy): Shade 6 or 8
- Oxygen Cutting (light): Shade 3 or 4
- Oxygen Cutting (medium): Shade 4 or 5
- Oxygen Cutting (heavy): Shade 5 or 6
It’s important to note that these are general guidelines. The true test of a correct shade is your comfort level. If your eyes feel strained, or if you can still see an afterimage after you finish welding, the shade is likely too light. On the other hand, if you can’t clearly see the weld puddle and the surrounding area, the shade is too dark, which can be just as dangerous as it impairs your ability to work safely and effectively.
Shade Recommendations for Specific Processes
Let’s take a closer look at the different welding processes and how the amperage directly impacts the required shade. Understanding the nuances of each process will help you apply the welding shade guide with chart more effectively.
Shielded Metal Arc Welding (SMAW or Stick) is one of the most common welding processes. It produces a very bright and unstable arc, which requires a dark shade. The amperage range for stick welding is broad, and the arc brightness can vary significantly depending on the type and diameter of the electrode. For a small 1/8-inch electrode running at 100 amps, a shade 10 is typically sufficient. However, for a larger 5/32-inch electrode at 200 amps, a shade 12 is a safer and more comfortable choice. The shade needs to be dark enough to protect your eyes from the intense light, but light enough for you to still see the weld puddle clearly.
Gas Metal Arc Welding (GMAW or MIG) is a semi-automatic process that is known for being relatively easy to learn. It produces a consistent arc, which can be less visually intense than stick welding at lower amperages. For light-duty sheet metal work, you might be in the 60-100 amp range, where a shade 10 is perfectly acceptable. However, as you move into thicker materials with higher amperages (150-250 amps), you should move up to a shade 11 or 12. Flux-cored welding (FCAW) is a variation of MIG welding that produces a very bright arc with a lot of spatter, making a shade 11 a general recommendation for all amperages.
Gas Tungsten Arc Welding (GTAW or TIG) is known for its clean, precise welds and low spatter. The arc is much more stable than stick or MIG, and at low amperages (less than 60 amps), a shade 8 is usually sufficient. However, TIG welding is often used on thicker materials at higher amperages, where you’ll need a shade 12. Because TIG welding often involves tacking or making small, quick welds, having an auto-darkening helmet with an adjustable shade is a huge advantage. The ability to quickly and easily change the shade for a variety of tasks is a key benefit of this type of helmet, as explained in our guide on the how do auto-darkening welding helmets work article.
Plasma Arc Cutting (PAC) is a cutting process, not a welding process, but it produces a very bright arc similar to welding. It requires a high level of protection. For light cutting jobs below 20 amps, a shade 9 might work. But as you increase the amperage to 40 amps or more, a shade 11 or 12 is necessary to protect your eyes from the increased light intensity. It’s crucial to remember that cutting can be even more visually intense than welding, so never take shortcuts with your lens shade.
Beyond the Chart: Factors That Influence Your Shade Choice
While the shade chart is a fantastic tool, it doesn’t account for every variable in a real-world welding environment. There are several other factors you need to consider when making your final decision.
Personal Comfort and Vision
Every welder’s eyes are different. Some people are more sensitive to light than others and may feel more comfortable using a shade one or two numbers darker than the chart recommends. The key is finding a shade that allows you to see the weld puddle and surrounding area clearly and comfortably. If you have to strain to see or if you experience a “whiteout” effect after the arc is extinguished, your shade is not right for you. This is where a high-quality auto-darkening helmet with a wide range of adjustable shades is a huge benefit. You can fine-tune the shade until you find the perfect balance of visibility and protection. If you are in the market for a new helmet, our guide to the best welding helmets can help you find a model that offers this kind of flexibility and more.
Ambient Light and Welding Position
The brightness of the surrounding environment can also influence your shade choice. If you are welding in a brightly lit shop or outdoors in direct sunlight, the ambient light can affect your perception of the arc. In these situations, you may need a slightly darker shade to prevent glare and ensure the arc’s light is properly contrasted. Conversely, if you are working in a poorly lit space, a slightly lighter shade might be necessary to see your workpiece before you strike the arc. This highlights the importance of having a helmet with a good optical clarity rating, which provides a crisp, clear view of your work. The flexibility of an auto-darkening helmet in these situations is a major advantage over a fixed-shade helmet. For more information on the different types of helmets, you can read about the types of welding helmets available on the market.
Arc Brightness and Material
Even within a single welding process, the type of material and shielding gas can affect the arc’s brightness. For example, welding aluminum with MIG can produce a brighter arc than welding steel at the same amperage. This is due to the reflective nature of aluminum and the specific properties of the shielding gas. Likewise, certain types of stick electrodes can produce a brighter arc than others. A skilled welder learns to intuitively adjust their shade based on these subtle differences, using the shade chart as a foundation and their own experience as a guide.
[AI Image Prompt: A split-screen image. On one side, a welder is using a helmet with a too-light shade, creating a painful, bright glare and squinting. On the other side, the same welder is using the correct shade, with the weld puddle clearly visible and a relaxed, focused posture. The contrast should be stark, emphasizing the importance of choosing the right shade for safety and comfort.]
Maintaining Your Lens and Helmet
No matter what shade you choose, it’s useless if your helmet and lens are not properly maintained. A dirty, scratched, or damaged lens can compromise your vision and safety, regardless of the shade number. A scratched outer lens can scatter light and create a distracting glare, while a dirty inner lens can make it difficult to see the weld puddle clearly. Furthermore, for auto-darkening helmets, a dirty sensor can prevent the lens from darkening, which is extremely dangerous. For this reason, regular cleaning and inspection are essential. For a detailed guide on how to properly care for your helmet’s lens, you can read our article on how to clean a welding helmet lens. Furthermore, you should regularly test your auto-darkening helmet’s functionality to ensure it is always ready to protect you. Our guide on how to test an auto-darkening welding helmet provides easy-to-follow instructions for this critical safety check.
Final Thoughts
In the end, a welding helmet lens shade guide with chart is a powerful tool for every welder. It provides a scientific, standardized framework for making the most important safety decision you can make on the job. While the numbers on the chart are an excellent starting point, remember that your personal comfort and ability to see the weld puddle are the ultimate indicators of the correct shade. Never compromise on safety by using a shade that is too light, and don’t impair your work by using one that is too dark. By combining the knowledge from a shade guide, the flexibility of a modern auto-darkening helmet, and a commitment to regular maintenance, you can ensure your eyes are protected from the moment you strike the arc to the final bead. Weld safely, weld with confidence, and always make the right shade choice for the job.
Amranul is a highly experienced product review writer with a passion for helping readers make smart, informed purchasing decisions. Since 2018, he has specialized in thoroughly researching and analyzing a wide range of products to deliver honest, in-depth reviews. Amranul combines technical accuracy with clear, engaging writing to break down complex product features and highlight true user value. Look for his reviews to find reliable information and expert insights you can trust before you buy!


